Setup and Configuration

This page walks you through setting up your camera and configuring BlinkEasy for reliable blink detection.

Adjusting Detection Sensitivity

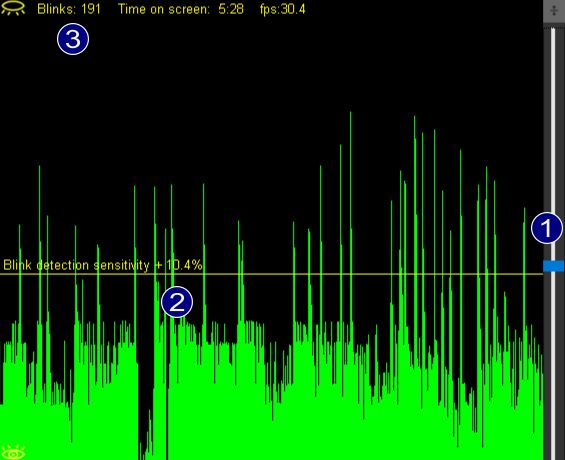
The histogram next to the video preview visualizes the opening and closing of your eyes in real-time, with sudden spikes indicating blinks.

  1. By moving the slider on the right, you can fine-tune the blink detection sensitivity to suit your setup.
  2. The yellow bar on the histogram indicates the threshold. Transitions between open and closed eyes that cross this bar will be recognized as a blink.
  3. Watch the top-left counter to confirm if your blinks are being detected correctly. Blink frequently while adjusting the slider.

After setting the sensitivity, move your head around without blinking to check for oversensitivity. If the settings are too high, rapid movements might trigger false positives (incorrectly detected blinks).

Setting the Target Blink Rate

In the lower area of the live page your blink rate over time is plotted. Here you can set a target blink rate; reminders will appear if your actual rate falls below it.

Men blink around 10 to 15 times per minute, while women blink more often, at 13–18 times per minute. Start with a value that is comfortable for you and gradually increase it.

Camera Position

For optimal results, position your camera to capture your face frontally (straight on). Center the camera on your screen, and tilt it slightly downward towards your face.

Webcams are usually designed to mount on top of your monitor. However, if you work a lot with physical documents and often look down at the table, you may get better results by mounting the camera below the screen so that the camera has an unobstructed view of your eyes.

If you use a secondary monitor, position the camera on your primary monitor about three-quarters of the way towards the secondary monitor, and angle it slightly toward your seating position to keep your face centered in the frame.

Keep the line of sight clear Regardless of where you mount your camera, make sure it can record your face from the front and has an unobstructed view of your pupils.

Selecting a Camera

BlinkEasy works with most cameras out of the box and supports a wide range of recording formats like NV21, NV12, YUV, and various RGB formats. In general, most webcams built in the past couple of years are sufficient, whether external USB devices or built-in laptop cameras.

The most important factor for blink detection is the frame rate — usually given by the manufacturer as frames per second (fps). Blinks are very quick events that typically last only 100 to 150 milliseconds (around 1/8 of a second). A camera capable of at least 30 fps is recommended, as it captures multiple frames across the start, middle, and end of each blink for more precise detection.

Many webcams reduce their frame rate in low lighting to compensate for the lack of light. Higher frame rate cameras maintain a more steady stream even when light conditions are suboptimal. If the frame rate drops too low, a warning will be displayed in the histogram window — below 15 fps, blink detection becomes unreliable.

The camera's resolution is less critical. While higher resolutions can improve detection, this comes at a significant cost in computing power. To avoid slowing down your system, the real-time analysis defaults to a medium resolution, which you can increase in the settings tab if needed.

Recommendation Get a high-fps webcam from a reputable brand — better sensors and optics produce less noisy images, which directly improves detection reliability.

Good Lighting

In low-light conditions many webcams will compensate by increasing exposure time — the shutter remains open longer to let enough light reach the sensor, which causes the frame rate to drop and can hinder blink detection.

For best results, make sure your workspace is well-lit with even, consistent lighting. Natural daylight or LED lamps work well; avoid harsh overhead lights that cast shadows across your face. If the lighting is not sufficient for clear camera capture, it is probably not ideal for your eyes either — dim environments contribute to eye strain and fatigue.

Troubleshooting Tips

Camera permission not granted

You will be asked by Windows or macOS to grant camera access when BlinkEasy launches for the first time. If you need to grant permission later, do so in your operating system's privacy settings on a per-application basis, then restart the app.

Camera blocked by another application

Under Windows, only one application can use a specific camera at a time. Closing the other application will release the camera. If you frequently use your camera for video conferencing, a secondary webcam is a good investment — BlinkEasy supports switching between multiple camera devices.

When wearing glasses

Make sure your pupils are visible and your eyelids are not covered by the frame. Increase the detection sensitivity as needed and minimize glare with indirect lighting. Slightly tinted glasses such as blue light filters are supported, but opaque glasses like sunglasses are not.

Games running in exclusive fullscreen mode

DirectX's exclusive fullscreen mode prevents other applications from drawing to the screen, which is mostly an issue with older games. Select "Windowed Fullscreen" in your game's video settings — otherwise only audio warnings will be available for the blink reminder.